> ## Documentation Index
> Fetch the complete documentation index at: https://ai-kb.automationanywhere.com/llms.txt
> Use this file to discover all available pages before exploring further.
# Integre el Chatbot de EKB a MS Teams
> Lleve EKB a MS Teams
Integrar EKB con Microsoft Teams le permite llevar chat inteligente y consciente del contexto directamente al entorno de colaboración de su equipo. Esta guía lo guía a través de los pasos para configurar el chatbot de EKB en Microsoft Teams, permitiendo una comunicación fluida con su agente de IA sin salir de la interfaz de Teams.
## Requisitos Previos
* Acceso de administrador a Azure para crear el bot
* Acceso de administrador al Portal de Desarrollo de Teams
## Pasos de Configuración
### 1. Cree el Bot de Azure
1. Go to the [Azure dashboard](https://portal.azure.com/).
2. Click **Create Resource**.
3. Type `Bot` in the search bar and select **Azure Bot**.
4. Create a new Azure Bot and set the desired **Display Name**.
### 2. Configure el Bot
5. Go to the **Configuration** tab and update the **Messaging Endpoint** to point to your server URL.
**Cloud** customers, please enter `https://api.getodin.ai/teams/events`
**On-Premise** customers, please enter `/teams/events`
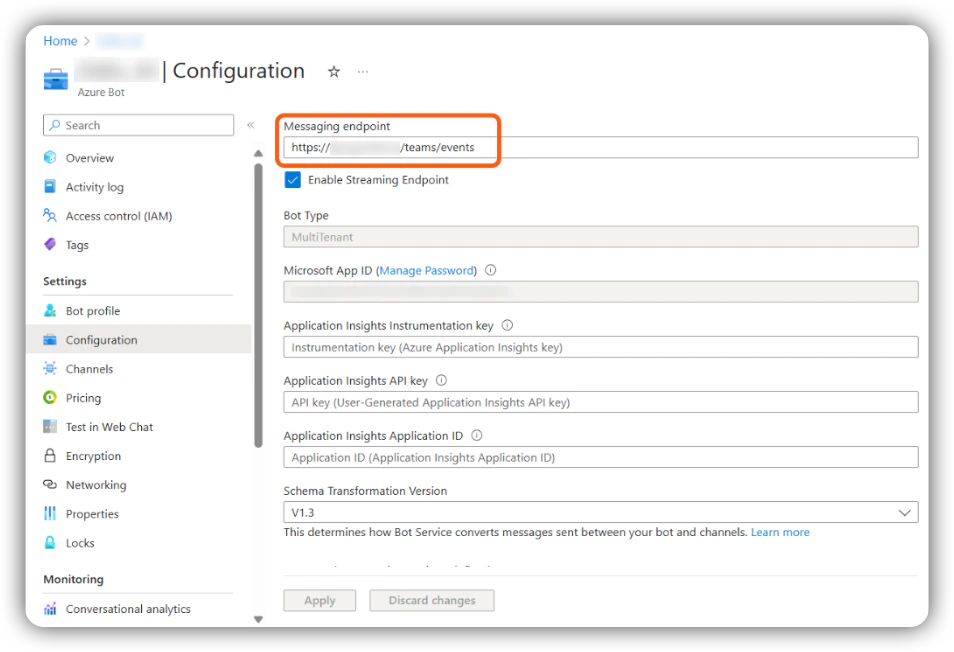 6. In the **Configuration** tab, copy the **App ID** and **Tenant ID**, then navigate to **Manage Passwords**.
7. Create a new password for the bot and save it for later use.
8. Enable a **streaming endpoint** for the bot in Azure and point it to the URL for that endpoint.
### 3. Habilite el Canal de Teams
9. Click **Channels** on the left side of the Azure portal and enable the **Teams** interaction channel for the bot.
### 4. Registre el Bot en EKB
Cloud customers, please open a support ticket with AA Support providing your `App ID`, `Tenant ID`, and `App Password` to have the bot registered for you.
10. In EKB, navigate to the **Super Admin** page and select **Teams Bots** on the left-hand side.
11. Click **Register Bot**.
12. Enter the **App ID**, **Tenant ID**, and **Password** collected in steps 6–7. Click **Register Bot**.
### 5. Cree la Aplicación en el Portal de Desarrollo de Teams
13. Go to the [Teams Developer Portal](https://dev.teams.microsoft.com/apps).
14. Click **New App**.
15. Populate the app information:
* **Short Description** — required, cannot be empty.
* **Long Description** — required, cannot be empty.
16. Populate the **App ID** field with the bot's App ID from Azure.
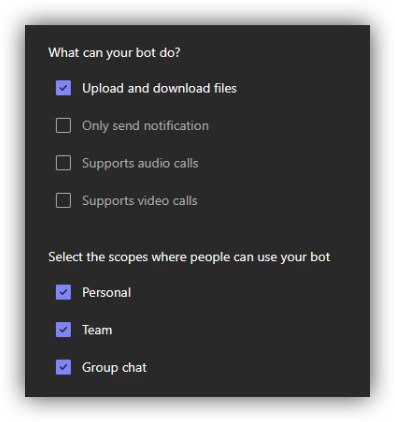
### 6. Configure las Funciones del Bot
17. Go to **App Features** and add the bot, providing the **App ID** from Azure.
18. Configure the bot capabilities as follows:
6. In the **Configuration** tab, copy the **App ID** and **Tenant ID**, then navigate to **Manage Passwords**.
7. Create a new password for the bot and save it for later use.
8. Enable a **streaming endpoint** for the bot in Azure and point it to the URL for that endpoint.
### 3. Habilite el Canal de Teams
9. Click **Channels** on the left side of the Azure portal and enable the **Teams** interaction channel for the bot.
### 4. Registre el Bot en EKB
Cloud customers, please open a support ticket with AA Support providing your `App ID`, `Tenant ID`, and `App Password` to have the bot registered for you.
10. In EKB, navigate to the **Super Admin** page and select **Teams Bots** on the left-hand side.
11. Click **Register Bot**.
12. Enter the **App ID**, **Tenant ID**, and **Password** collected in steps 6–7. Click **Register Bot**.
### 5. Cree la Aplicación en el Portal de Desarrollo de Teams
13. Go to the [Teams Developer Portal](https://dev.teams.microsoft.com/apps).
14. Click **New App**.
15. Populate the app information:
* **Short Description** — required, cannot be empty.
* **Long Description** — required, cannot be empty.
16. Populate the **App ID** field with the bot's App ID from Azure.
### 6. Configure las Funciones del Bot
17. Go to **App Features** and add the bot, providing the **App ID** from Azure.
18. Configure the bot capabilities as follows:
 ### 7. Despliegue
19. Deploy the package following your organization's standard policy for deploying new Teams applications.
20. To configure the bot's access to projects, send it the `!setup` command as a first message.
***
## Método de Despliegue Recomendado
En la página de la aplicación en el Panel de Desarrollo de Microsoft Teams, desplácese hacia abajo en la barra lateral izquierda. Bajo **Publish**, seleccione **Publish to org**.
### 7. Despliegue
19. Deploy the package following your organization's standard policy for deploying new Teams applications.
20. To configure the bot's access to projects, send it the `!setup` command as a first message.
***
## Método de Despliegue Recomendado
En la página de la aplicación en el Panel de Desarrollo de Microsoft Teams, desplácese hacia abajo en la barra lateral izquierda. Bajo **Publish**, seleccione **Publish to org**.
 La aplicación se publicará en su instancia de Teams y puede requerir el consentimiento del Administrador. El consentimiento puede otorgarse desde el [Centro de Administración de Microsoft Teams](https://admin.teams.microsoft.com/dashboard).
Después de que se otorgue el consentimiento, espere algunas horas para que los permisos se propaguen antes de que el bot sea utilizable. Este retraso es causado por el proceso de revisión interno de Microsoft para aplicaciones personalizadas, incluso cuando están restringidas a una sola organización.
***
## Granularidad de los Ajustes del Bot de Teams
Después de completar la configuración inicial, envíe el comando `!setup` al bot para comenzar a recibir respuestas en Microsoft Teams.
### Comportamiento Predeterminado
Por defecto, los ajustes del bot tienen granularidad **por bot, por instancia de Teams**. El proyecto, la clave API y el secreto configurados para el bot se aplican en toda la instancia de Teams — incluyendo todos los canales, grupos y mensajes directos.
### Ajustes por Canal (Solo On-Premise)
Para una mayor granularidad — como usar un bot con múltiples proyectos dependiendo del canal, grupo o usuario — establezca la siguiente variable de entorno del backend:
```env theme={null}
TEAMS_USE_PER_CHANNEL_SETTINGS=TRUE
```
Este ajuste solo está disponible para **clientes on-premise**. No es compatible con despliegues alojados en la nube.
### Selección de Agente
En todas las configuraciones, el Bot de Teams interactúa con el **agente predeterminado actualmente establecido** del proyecto. Actualmente no hay opción para seleccionar un agente diferente.
La aplicación se publicará en su instancia de Teams y puede requerir el consentimiento del Administrador. El consentimiento puede otorgarse desde el [Centro de Administración de Microsoft Teams](https://admin.teams.microsoft.com/dashboard).
Después de que se otorgue el consentimiento, espere algunas horas para que los permisos se propaguen antes de que el bot sea utilizable. Este retraso es causado por el proceso de revisión interno de Microsoft para aplicaciones personalizadas, incluso cuando están restringidas a una sola organización.
***
## Granularidad de los Ajustes del Bot de Teams
Después de completar la configuración inicial, envíe el comando `!setup` al bot para comenzar a recibir respuestas en Microsoft Teams.
### Comportamiento Predeterminado
Por defecto, los ajustes del bot tienen granularidad **por bot, por instancia de Teams**. El proyecto, la clave API y el secreto configurados para el bot se aplican en toda la instancia de Teams — incluyendo todos los canales, grupos y mensajes directos.
### Ajustes por Canal (Solo On-Premise)
Para una mayor granularidad — como usar un bot con múltiples proyectos dependiendo del canal, grupo o usuario — establezca la siguiente variable de entorno del backend:
```env theme={null}
TEAMS_USE_PER_CHANNEL_SETTINGS=TRUE
```
Este ajuste solo está disponible para **clientes on-premise**. No es compatible con despliegues alojados en la nube.
### Selección de Agente
En todas las configuraciones, el Bot de Teams interactúa con el **agente predeterminado actualmente establecido** del proyecto. Actualmente no hay opción para seleccionar un agente diferente.